In this article, we are going to talk about the open source telephone system called FreeSwitch. This system can be used as PBX station. It should be mentioned that FreeSwitch works on Windows, Mac OS X, BSD, Solaris and Linux. FreeSwitch developers participate in other open source projects and contribute to Asterisk, SIPX, CallWeaver. FreeSwitch supports various protocols, such as SIP, H.323, IAX2, which allows you to interact with sipX, OpenPBX, Bayonne, Yate, or Asterisk.
Use virtual phone number for FreeSwitch:
Step №1. Buy a virtual phone number
- Register on the website or enter your personal account, if you have already registered;
- Top up your balance with the cost of connecting the number and the amount of the subscriber. fees for 1 month;
- Choose the type of number;
- Choose a country;
- Choose a city or operator code;
- Set up forwarding for receiving calls (phone number or SIP);
- Choose subscription period for the number: 1, 3, 6, or 12 months (2-18% discount based on the period of subscription and the price of the number).
- Check your details and complete the order.
Step №2. Get and setup a SIP account
Automatically obtaining a SIP account:
- When buying a number, you need to specify the call forwarding to SIP;
- We will send the data for setting up the SIP account (domain, username, and password) to your registration mail along with a notification about the connection of the number;
- In the future, if you need, you can always change the call forwarding to a phone number in your personal account.
Order SIP account:
- To get a new SIP account or to order additional SIP accounts for your number, you need to create a request from your personal account with the subject "Order SIP account", after that all the data for setting up a SIP account (domain, login and password) we will send to your registration mail.
Step №3. Setup a SIP-application for receiving and making calls
- You need to pass to the page - "Install softphone: SIP-application for outgoing and incoming calls", where you can get acquainted in detail with how to download and setup the application for calls to a PC or smartphone.
- Done! Now you can make internet calls. All that is needed for work is access to the Internet.
We are going to tell you more concerning the configuration, work of FreeSwitch system and features they offer. As this telephone platform has the peculiarities of PBX station, you will understand why do you need to install this for your office telephony or other telephone purposes.
How to set up FreeSwitch
Find out more about FreeSwitch settings to make managing international/out of area calls for your company fast and convenient! For this, please, do the following:
The first thing you need to do is to change your default password 1234 to a more secure one. File: /etc/freeswitch/vars.xml
<X-PRE-PROCESS cmd="set" data="default_password=1234"/> – your hard password
1
. Create a file /etc/freeswitch/sip_profiles/external/freezvon.xml<include>
<gateway name="freezvon">
<param name="username" value="XXXXXXXXX"/> – your sip number
<param name="password" value="XXXXXXXXX"/> – your sip password
<param name="realm" value="sip.freezvon.com"/>
<param name="from-user" value="XXXXXXXXX"/> – your sip number
<param name="from-domain" value="sip.freezvon.com"/>
<param name="proxy" value="sip.freezvon.com"/>
<param name="expire-seconds" value="300"/>
<param name="register" value="true"/>
<param name="register-transport" value="udp"/>
<param name="context" value="freezvon"/>
</gateway>
</include>
2
. Create a file with dial plan configurations /etc/freeswitch/dialplan/freezvon.xml<?xml version="1.0" encoding="UTF-8"?>
<include>
<context name="freezvon">
<extension name="unloop">
<condition field="$${unroll_loops}" expression="^true$" />
<condition field="${sip_looped_call}" expression="^true$">
<action application="deflect" data="${destination_number}" />
</condition>
</extension>
<extension name="in-freezvon">
<condition field="destination_number" expression="^(XXXXXXXX)$"> – your sip number
<action application="bridge" data="user/1000@$${domain}"/>
<action application="hangup"/>
</condition>
</extension>
<extension name="out-freezvon">
<condition field="destination_number" expression="^(\d{10,15})$">
<action application="bridge" data="sofia/gateway/freezvon/$1"/>
<action application="hangup"/>
</condition>
</extension>
<extension name="local">
<condition field="destination_number" expression="^\d{4}$">
<action application="answer" />
<action application="sleep" data="1000" />
<action application="bridge" data="user/${destination_number}@$${domain}" />
<action application="hangup" />
</condition>
</extension>
</context>
</include>
3
. Choose an internal SIP number to be used in a softphone or IP-phone to make outgoing and receiving calls. Edit the file. /etc/freeswitch/directory/default/1000.xml;<include>
<user id="1000">
<params>
<param name="password" value="your_hard_pasword"/>
<param name="vm-password" value="1000"/>
</params>
<variables>
<variable name="toll_allow" value="domestic,international,local"/>
<variable name="accountcode" value="1000"/>
<variable name="user_context" value="freezvon"/>
<variable name="effective_caller_id_name" value="Extension 1000"/>
<variable name="effective_caller_id_number" value="1000"/>
</variables>
</user>
</include>
4
. Please, execute this command to make FreeSwitch read configuration files:fs_cli -x reloadxml
5
. To check if SIP is registered, please, open the FreeSwitch client by running fs_cli and execute a command:sofia status gateway

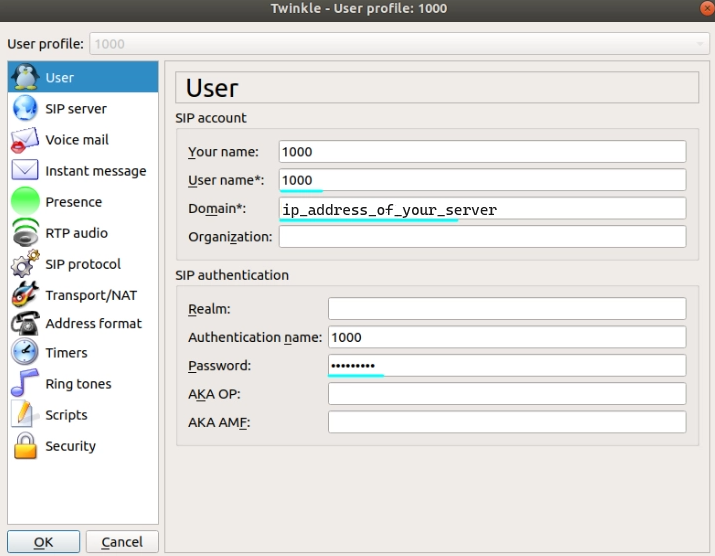
Try to register at ip_address_of_your_server by using the login: 1000 (in our example; you can use any login you want but it must be the same one everywhere) and the password.
Soft_Phone settings:
Configuration of the fail2ban intrusion prevention system for Freeswitch for CentOS
To install the intrusion prevention software fail2ban, you need to execute the following console command:
yum install fail2ban
This software is going to be downloaded and installed from the Web allowing you to proceed with the configuration. You need to use the file: /etc/fail2ban/jail.conf for this. Find a section containing freeswitch and add the following changes to it:
[freeswitch]
enabled = true
port = 5060,5061
action = %(banaction)s[name=%(__name__)s-tcp, port="%(port)s", protocol="tcp", chain="%(chain)s", actname=%(banaction)s-tcp]
%(banaction)s[name=%(__name__)s-udp, port="%(port)s", protocol="udp", chain="%(chain)s", actname=%(banaction)s-udp]
%(mta)s-whois[name=%(__name__)s, dest="%(destemail)s"]
logpath = /var/log/freeswitch/freeswitch.log
maxretry = 5
bantime = 60000
Please, save the changes and close the file.
Now you need to add fail2ban to autostart by using a command:
chkconfig fail2ban on
then you can run the command:
service fail2ban start
After that, you need to enable the logging at FreeSWITCH. Please, enable the following configuration in the file: /etc/freeswitch/sip_profiles/freezvon.xml
<param name="log-auth-failures" value="true"/>
After that, please, open the file: /etc/freeswitch/autoload_configs/logfile.conf.xml and modify the route to the file:
<param name="logfile" value="/var/log/freeswitch/freeswitch.log"/>
Save the changes and restart freeswitch.
To show current status, please, execute the command:
fail2ban-client status freeswitch
You will get the information about the current status of freeswitch filter.
Status for the jail: freeswitch
|- Filter
| |- Currently failed: 0
| |- Total failed: 0
| `- File list: /var/log/freeswitch/freeswitch.log
`- Actions
|- Currently banned: 0
|- Total banned: 0
`- Banned IP list:
If you have several questions, just contact our technical team department here. We are available via online live chat, Skype, email or other phone numbers you may see on this website on a page called “Support”. We are going to make the situation clearer about VoIP telephony services including PBX or FreeSwitch you want to order.